
Sketch UI
Improvements to Prototype Scrolling
The ability to have scrolling is a cornerstone of any meaningful prototype, so implementing it should be a thoughtless process.
When Sketch introduced nested Frames within Canvas Frames — functionality previously unavailable with Artboards — it unlocked powerful new possibilities. However, accommodating this change introduced three significant problems:
- Configuring scrolling on a Canvas Frame became unnecessarily complex and confusing.
- Scroll areas could be defined as larger than their container — a setting with no logical effect.
- There was no visual indication of where the scroll boundary fell.

Problem 1:
Expanding the app‘s prototyping capabilities inadvertently introduced a regression: what once required zero configuration now demanded multiple manual steps per Frame. Scrolling had quietly gone from “it just works” to a source of real friction…

Previously – with Artboards
Selecting an Artboard Preset was the only step required. Extending the Artboard height automatically enabled scrolling. No further configuration was needed.
- After placing an Artboard Preset and extending the height…
- That‘s it. Nothing more is needed. It just works.
Total steps to configure scrolling: 0.
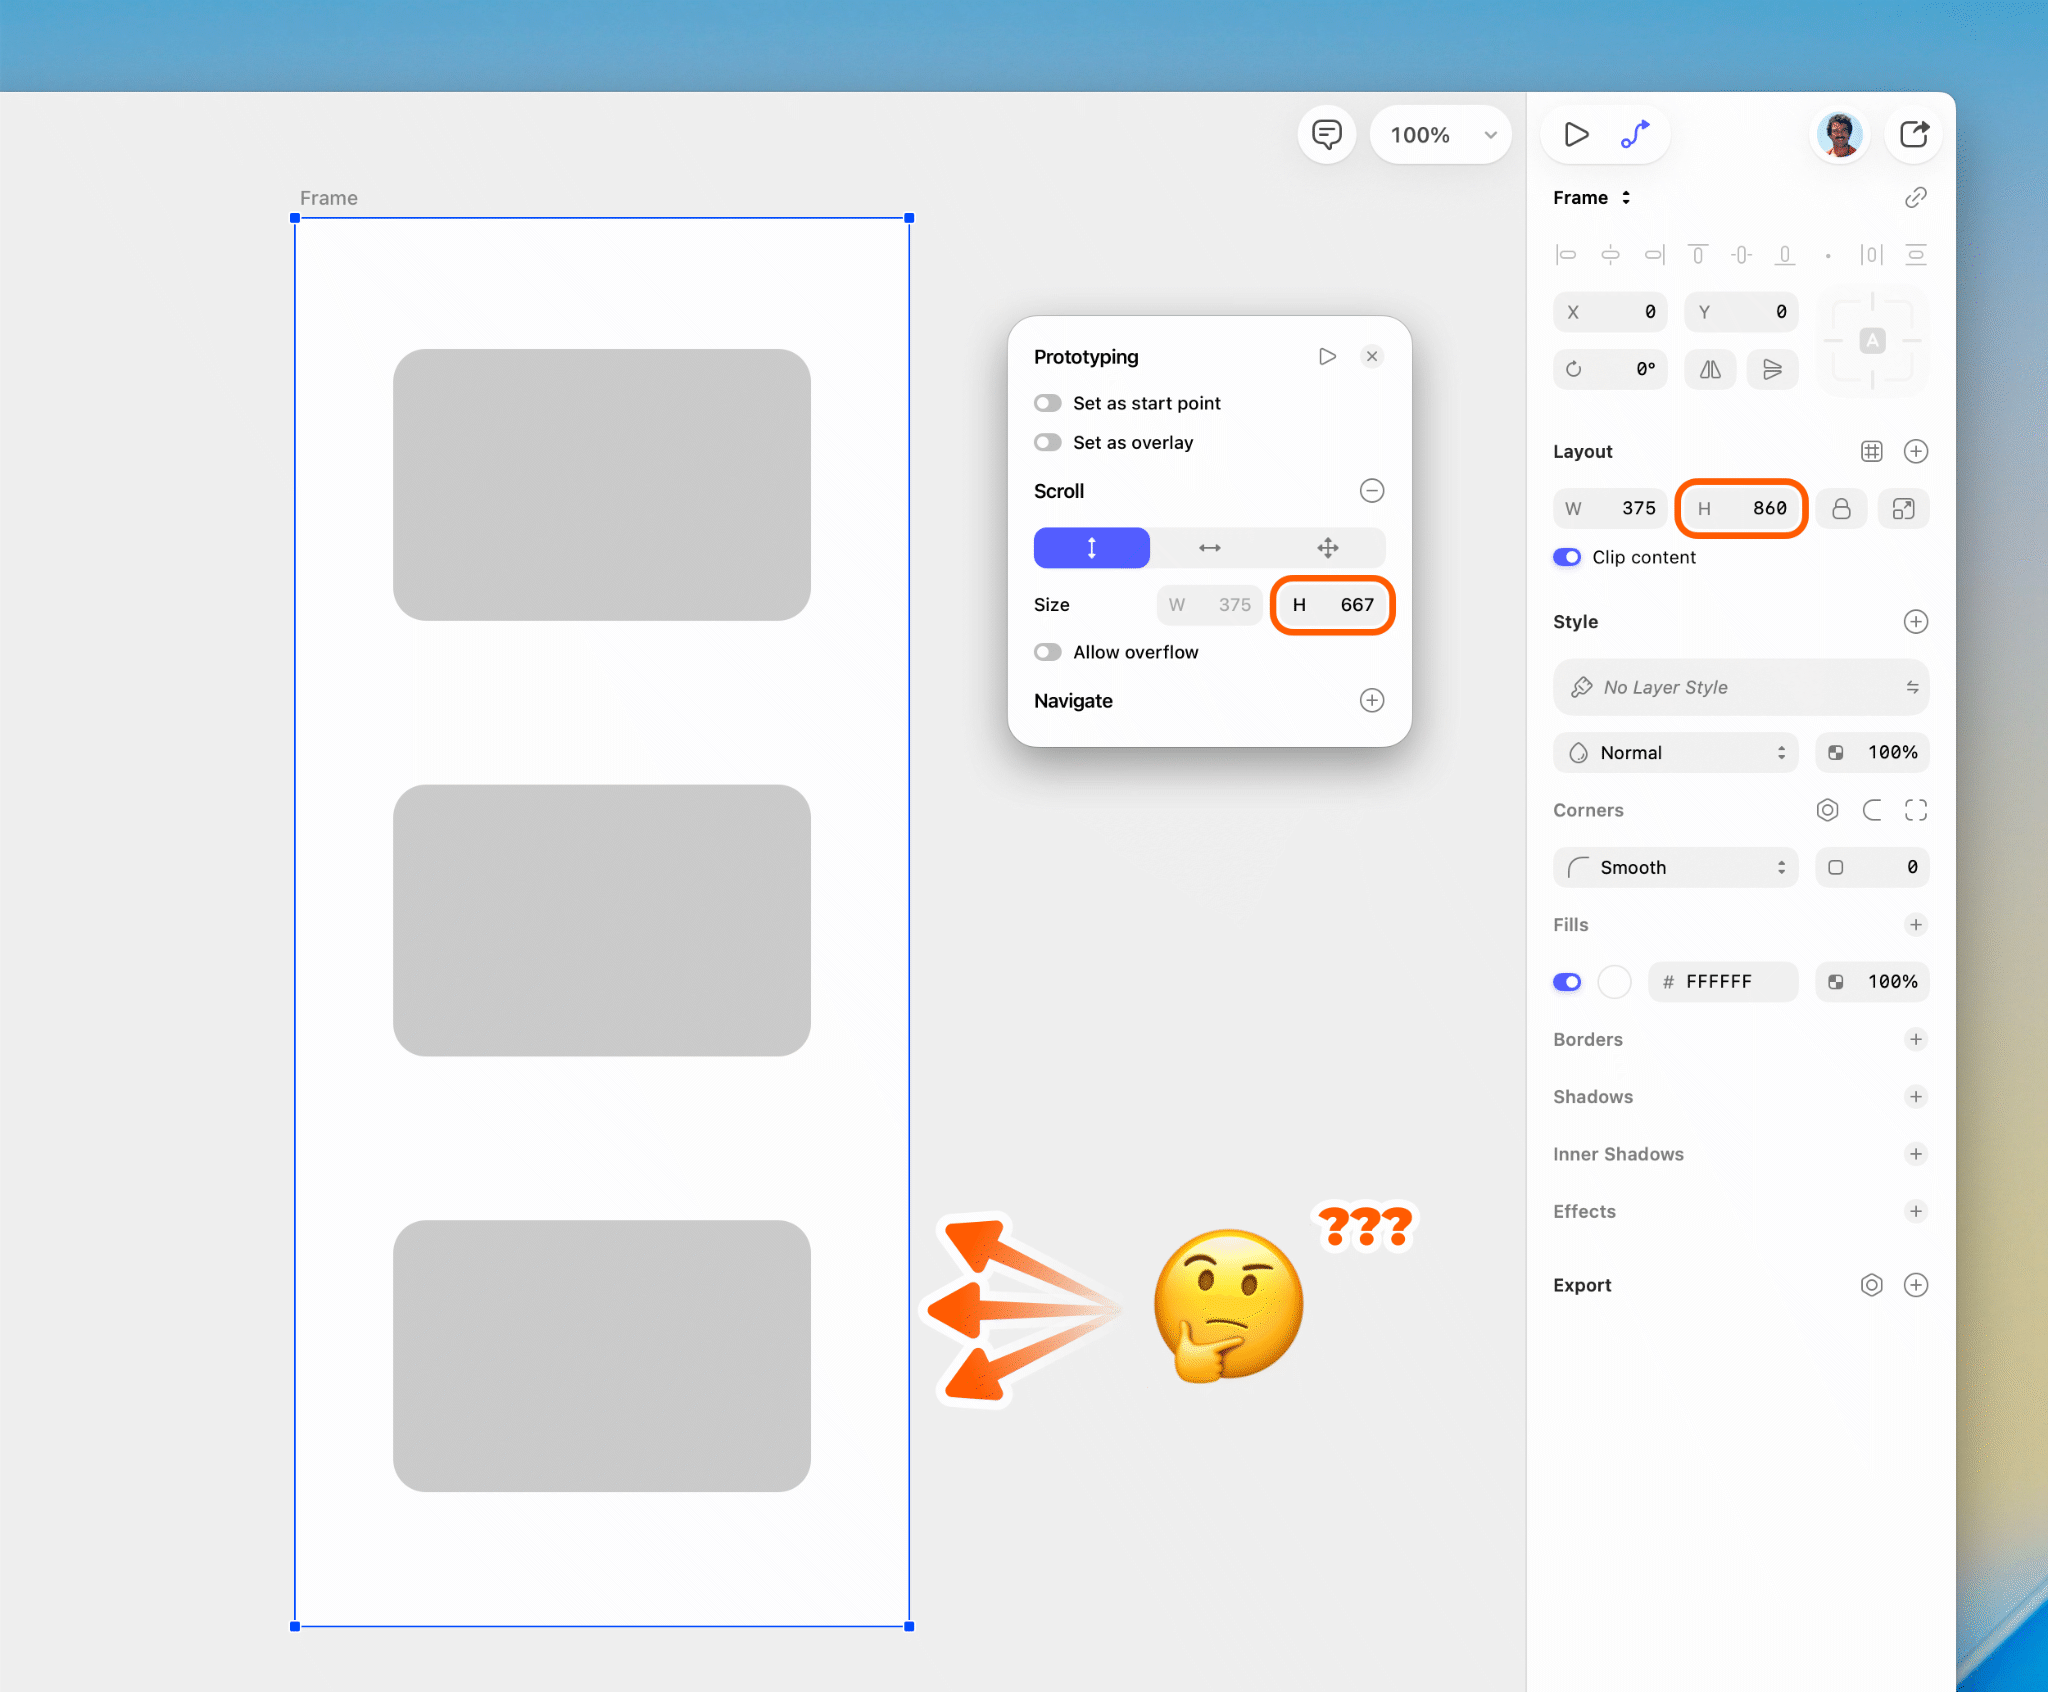
Currently – when using a Frame Preset
Even with a Frame Preset — with a preset size — not only is scrolling required to be manually enabled every time, but the size of the scroll area must be set too.
- After placing a Frame Preset and extending the height…
- ACTION 1: Open the Prototype panel.
– No scrolling is applied by default. Why not? - ACTION 2: Click to enable Scrolling.
– The Viewport defaults to “Frame”, the full extended height, not the Preset size. Why> - ACTION 3: Open the dropdown and switch to “Custom”.
- Only then does the scroll area correctly reflect the original Preset dimensions.
- Now scrolling in the prototype works, but the path to get there is needlessly confusing and repetitive.
Total steps to configure scrolling: 3 — for every single Frame.
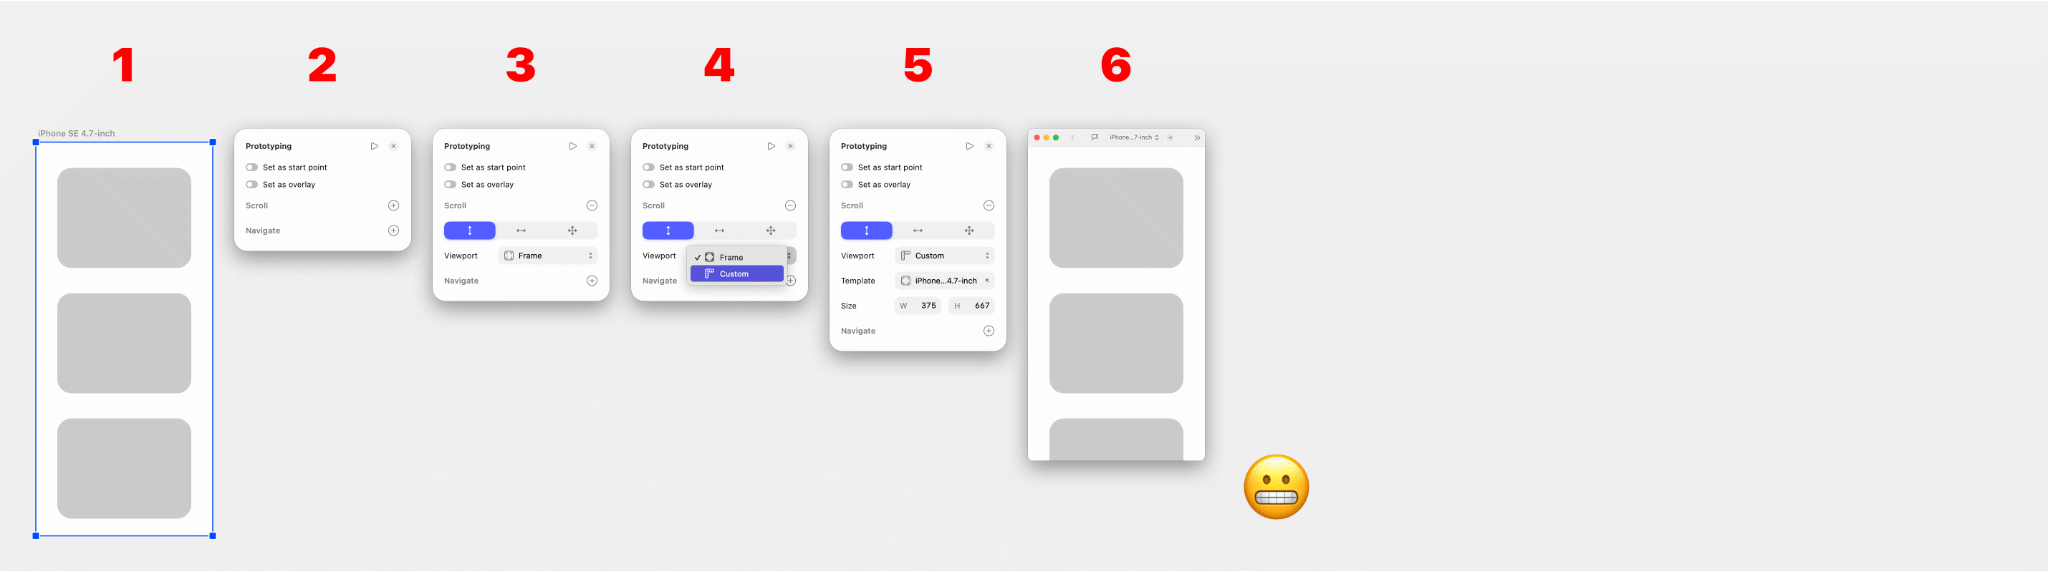
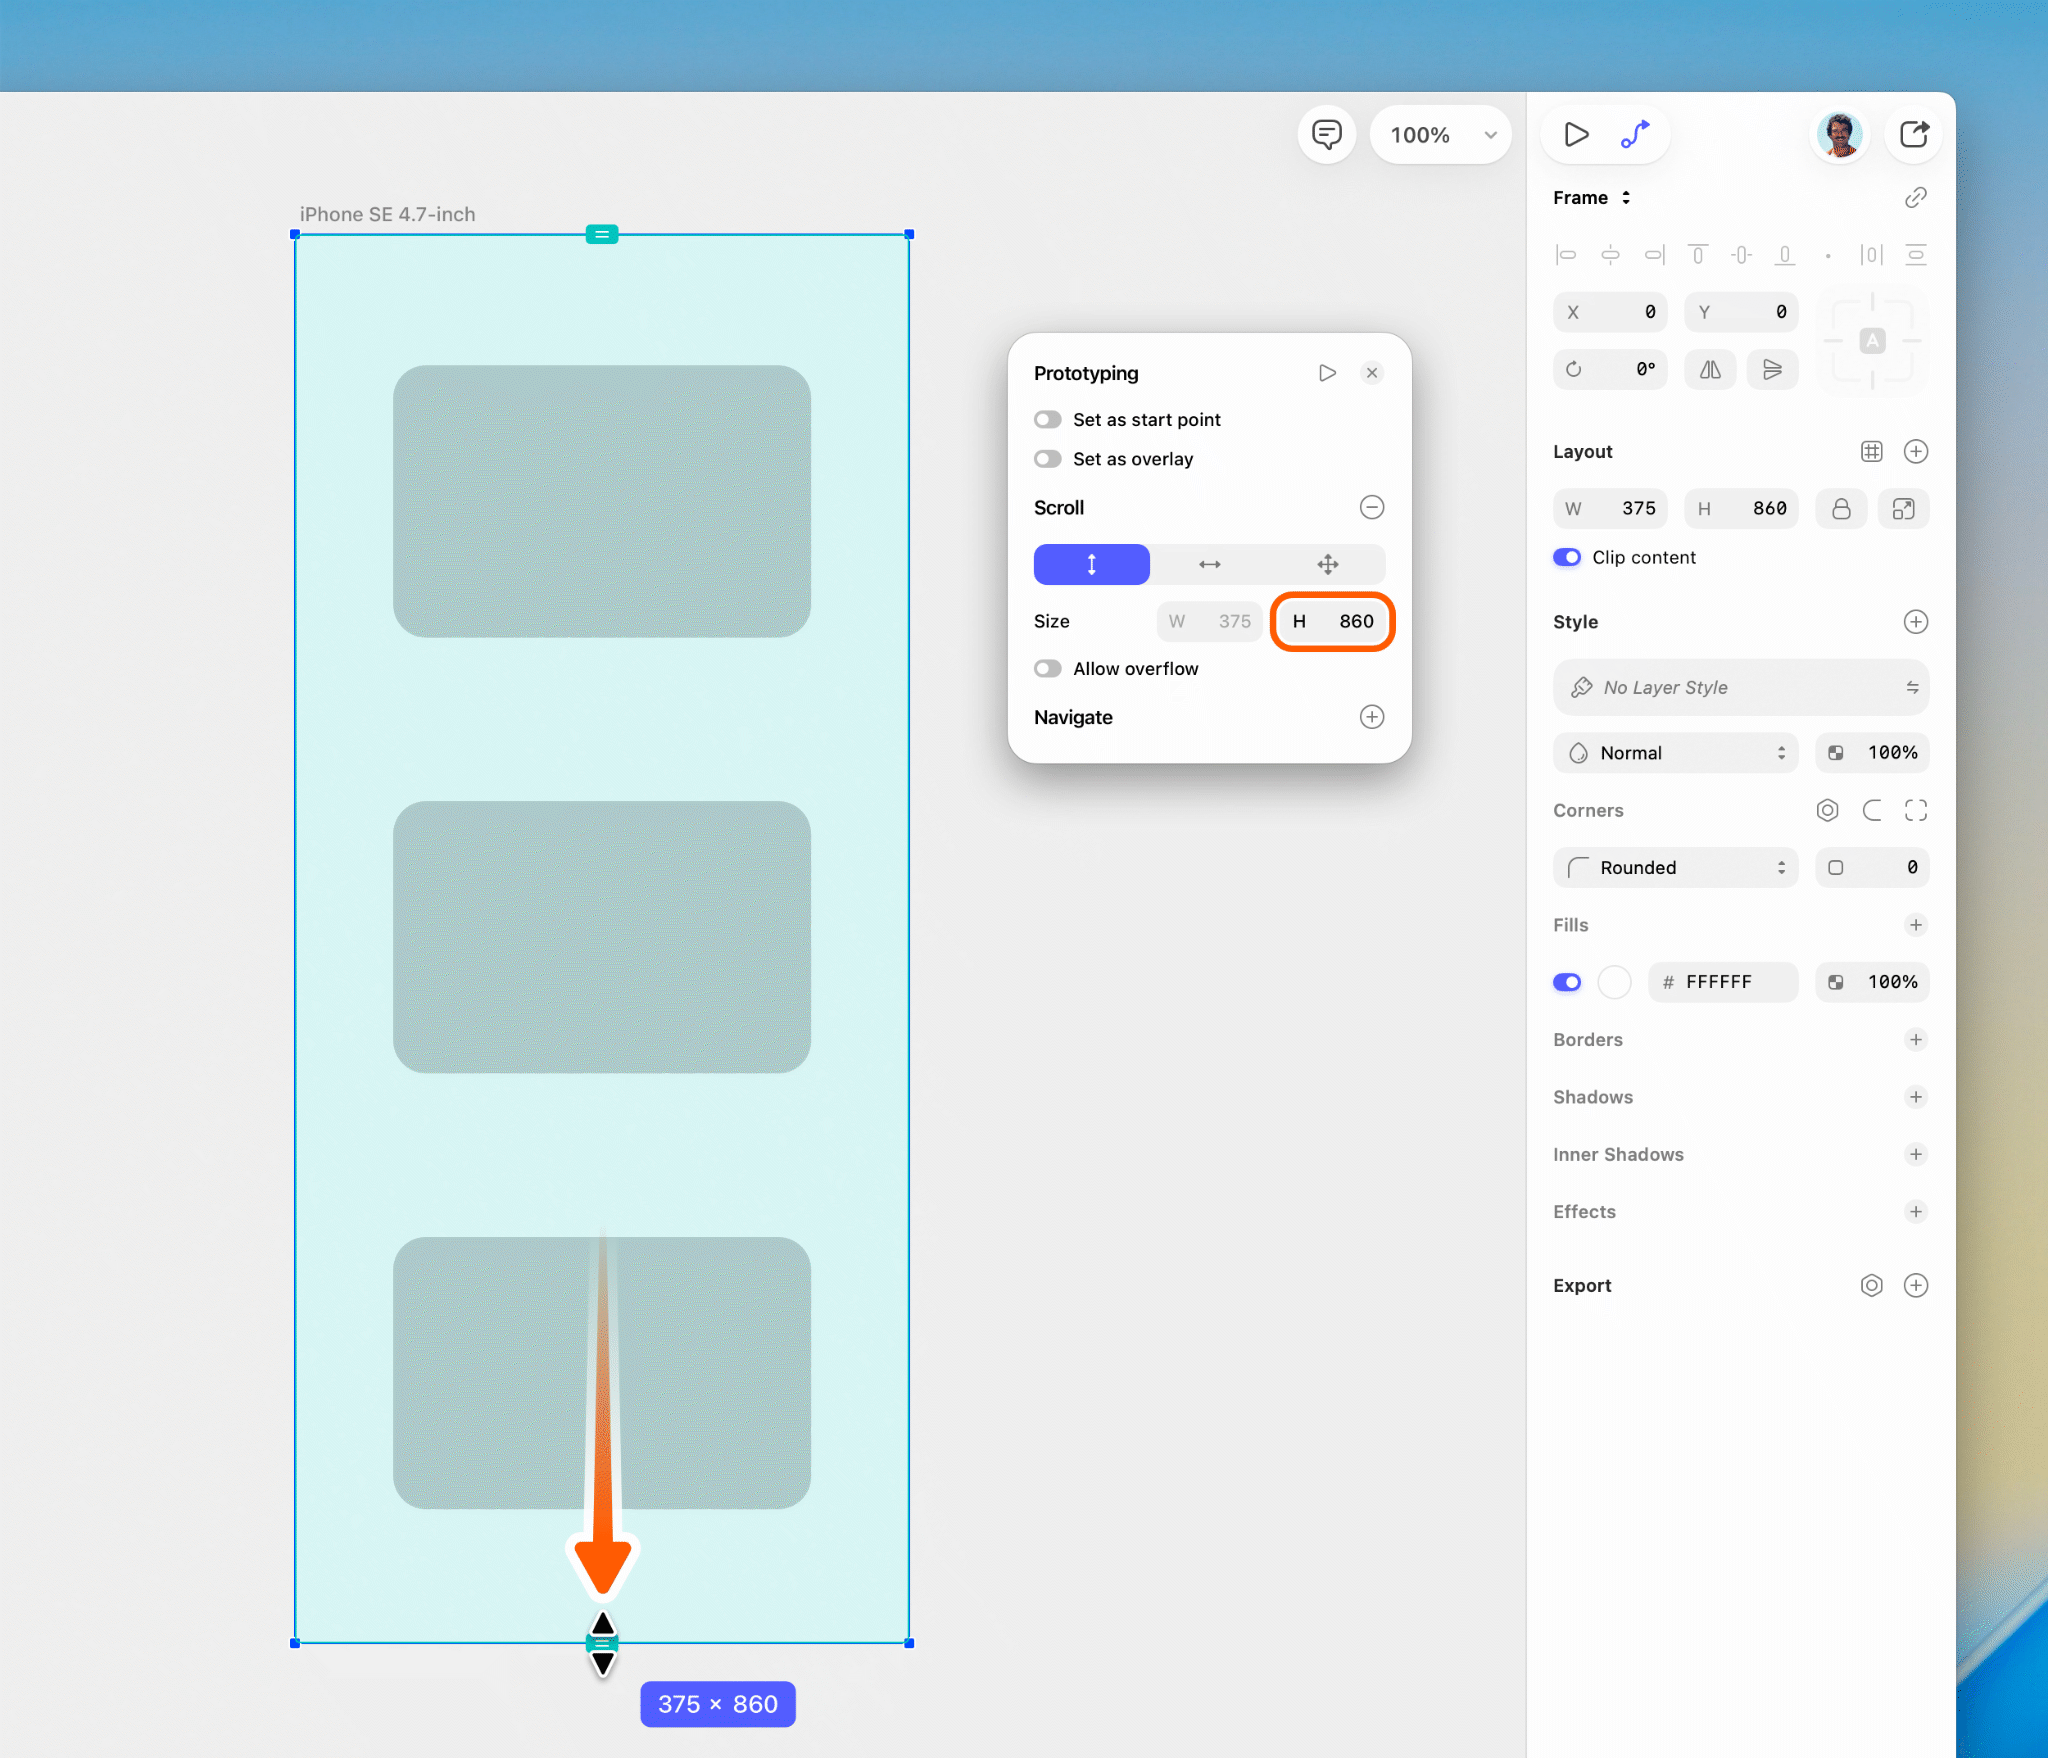
Currently – when using a basic Frame (non-Preset)
The situation deteriorates further. After placing a Frame Preset, pressing “F” presents a convenient prompt to create a new Frame at the same size. Helpful — until scrolling needs to be configured.
This second Frame is treated as a plain custom Frame, not a Preset, so it doesn’t inherit the Preset’s scroll dimensions. It defaults to the full Frame height instead, requiring users to manually hunt down the original Preset — one they may no longer remember.
- After placing a second Frame, matching the previous Preset’s size with its extended height…
- ACTION 1: Open the Prototype panel.
– Again, no scrolling is applied by default. - ACTION 2: Click to enable Scrolling.
– The Viewport defaults to the full Frame height. - ACTION 3: Open the dropdown and switch to “Custom”.
– The “Custom” size is still the full Frame height — not the Preset dimensions - ACTION 4: Open dropdown to change Template Custom size.
- A sub-panel of the main panel opens, so we have panels popping out panels.
- ACTION 5: Manually scroll or search for the correct Preset.
– If it’s been forgotten, one would have to navigate to an earlier Frame to identify it, adding more steps here. - ACTION 6: Select the Preset. Only then does the scroll area correctly reflect it.
- Now scrolling in the prototype works. But it’s even more confusing, and even more steps to get here.
Total steps to configure scrolling: 6 (potentially more) — for every single Frame.
The mistaken assumption…
The current default mistakenly assumes two things, and gets it wrong.
- Users do not want scrolling in their prototypes as a default (they do).
- If they do want scrolling, they would place the scrolling content below the current baseline of their Frame Preset (they don’t).
In practice, nobody designs this way. When users want to see all their content, they simply extend the Frame height to view it.
Any edge cases where a full-height Viewport with content flowing outside of it might be intentional — such as Overlays — would be covered by the “Allow overflow” option which I introduced.
The solutions…
I identified solutions that restore the original “it just works” experience while fully preserving all new functionality: automatic Frame sizing, custom scroll area overrides, and nested Frame scrolling. Crucially, no structural changes are required — only targeted UI adjustments.
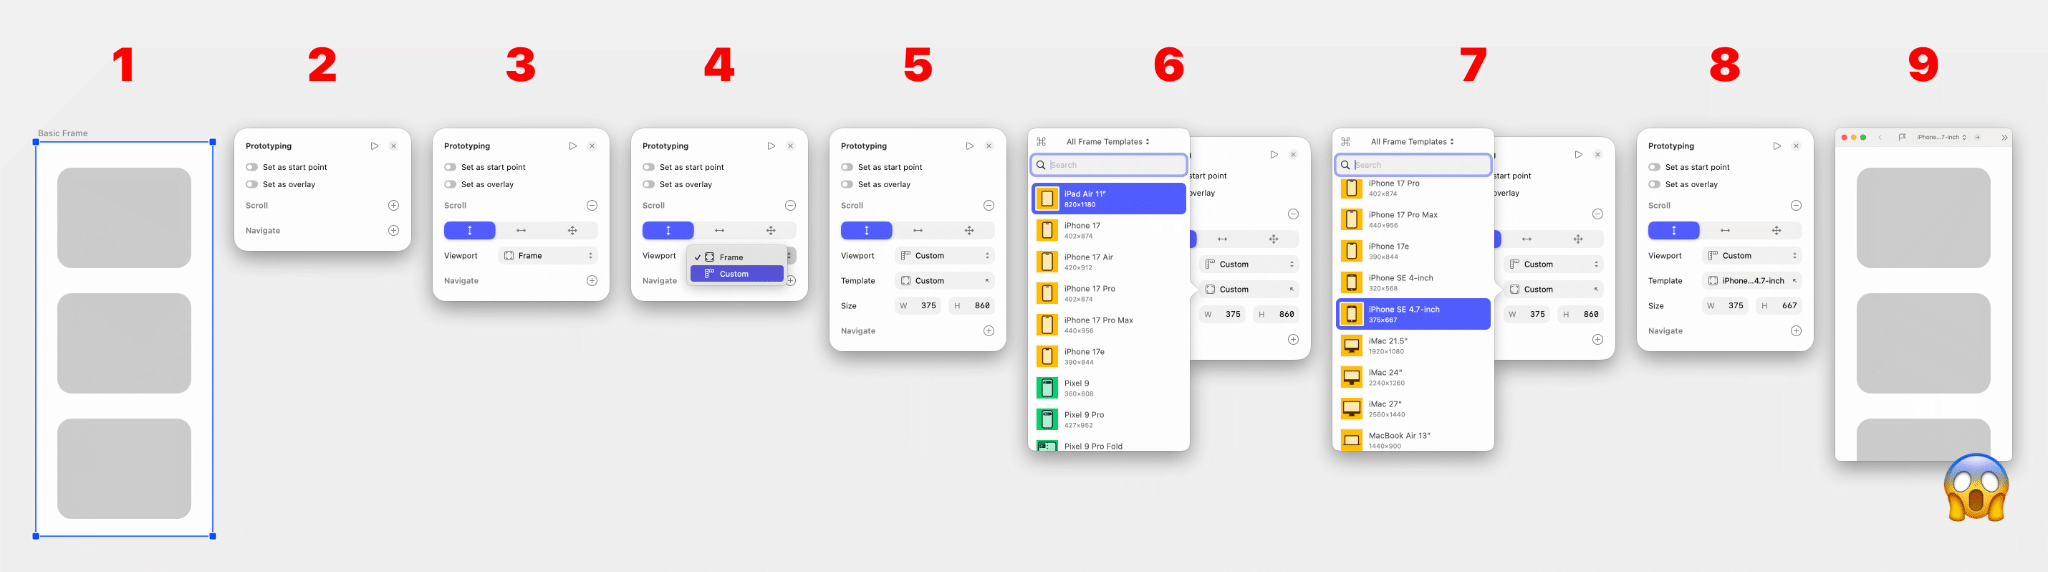
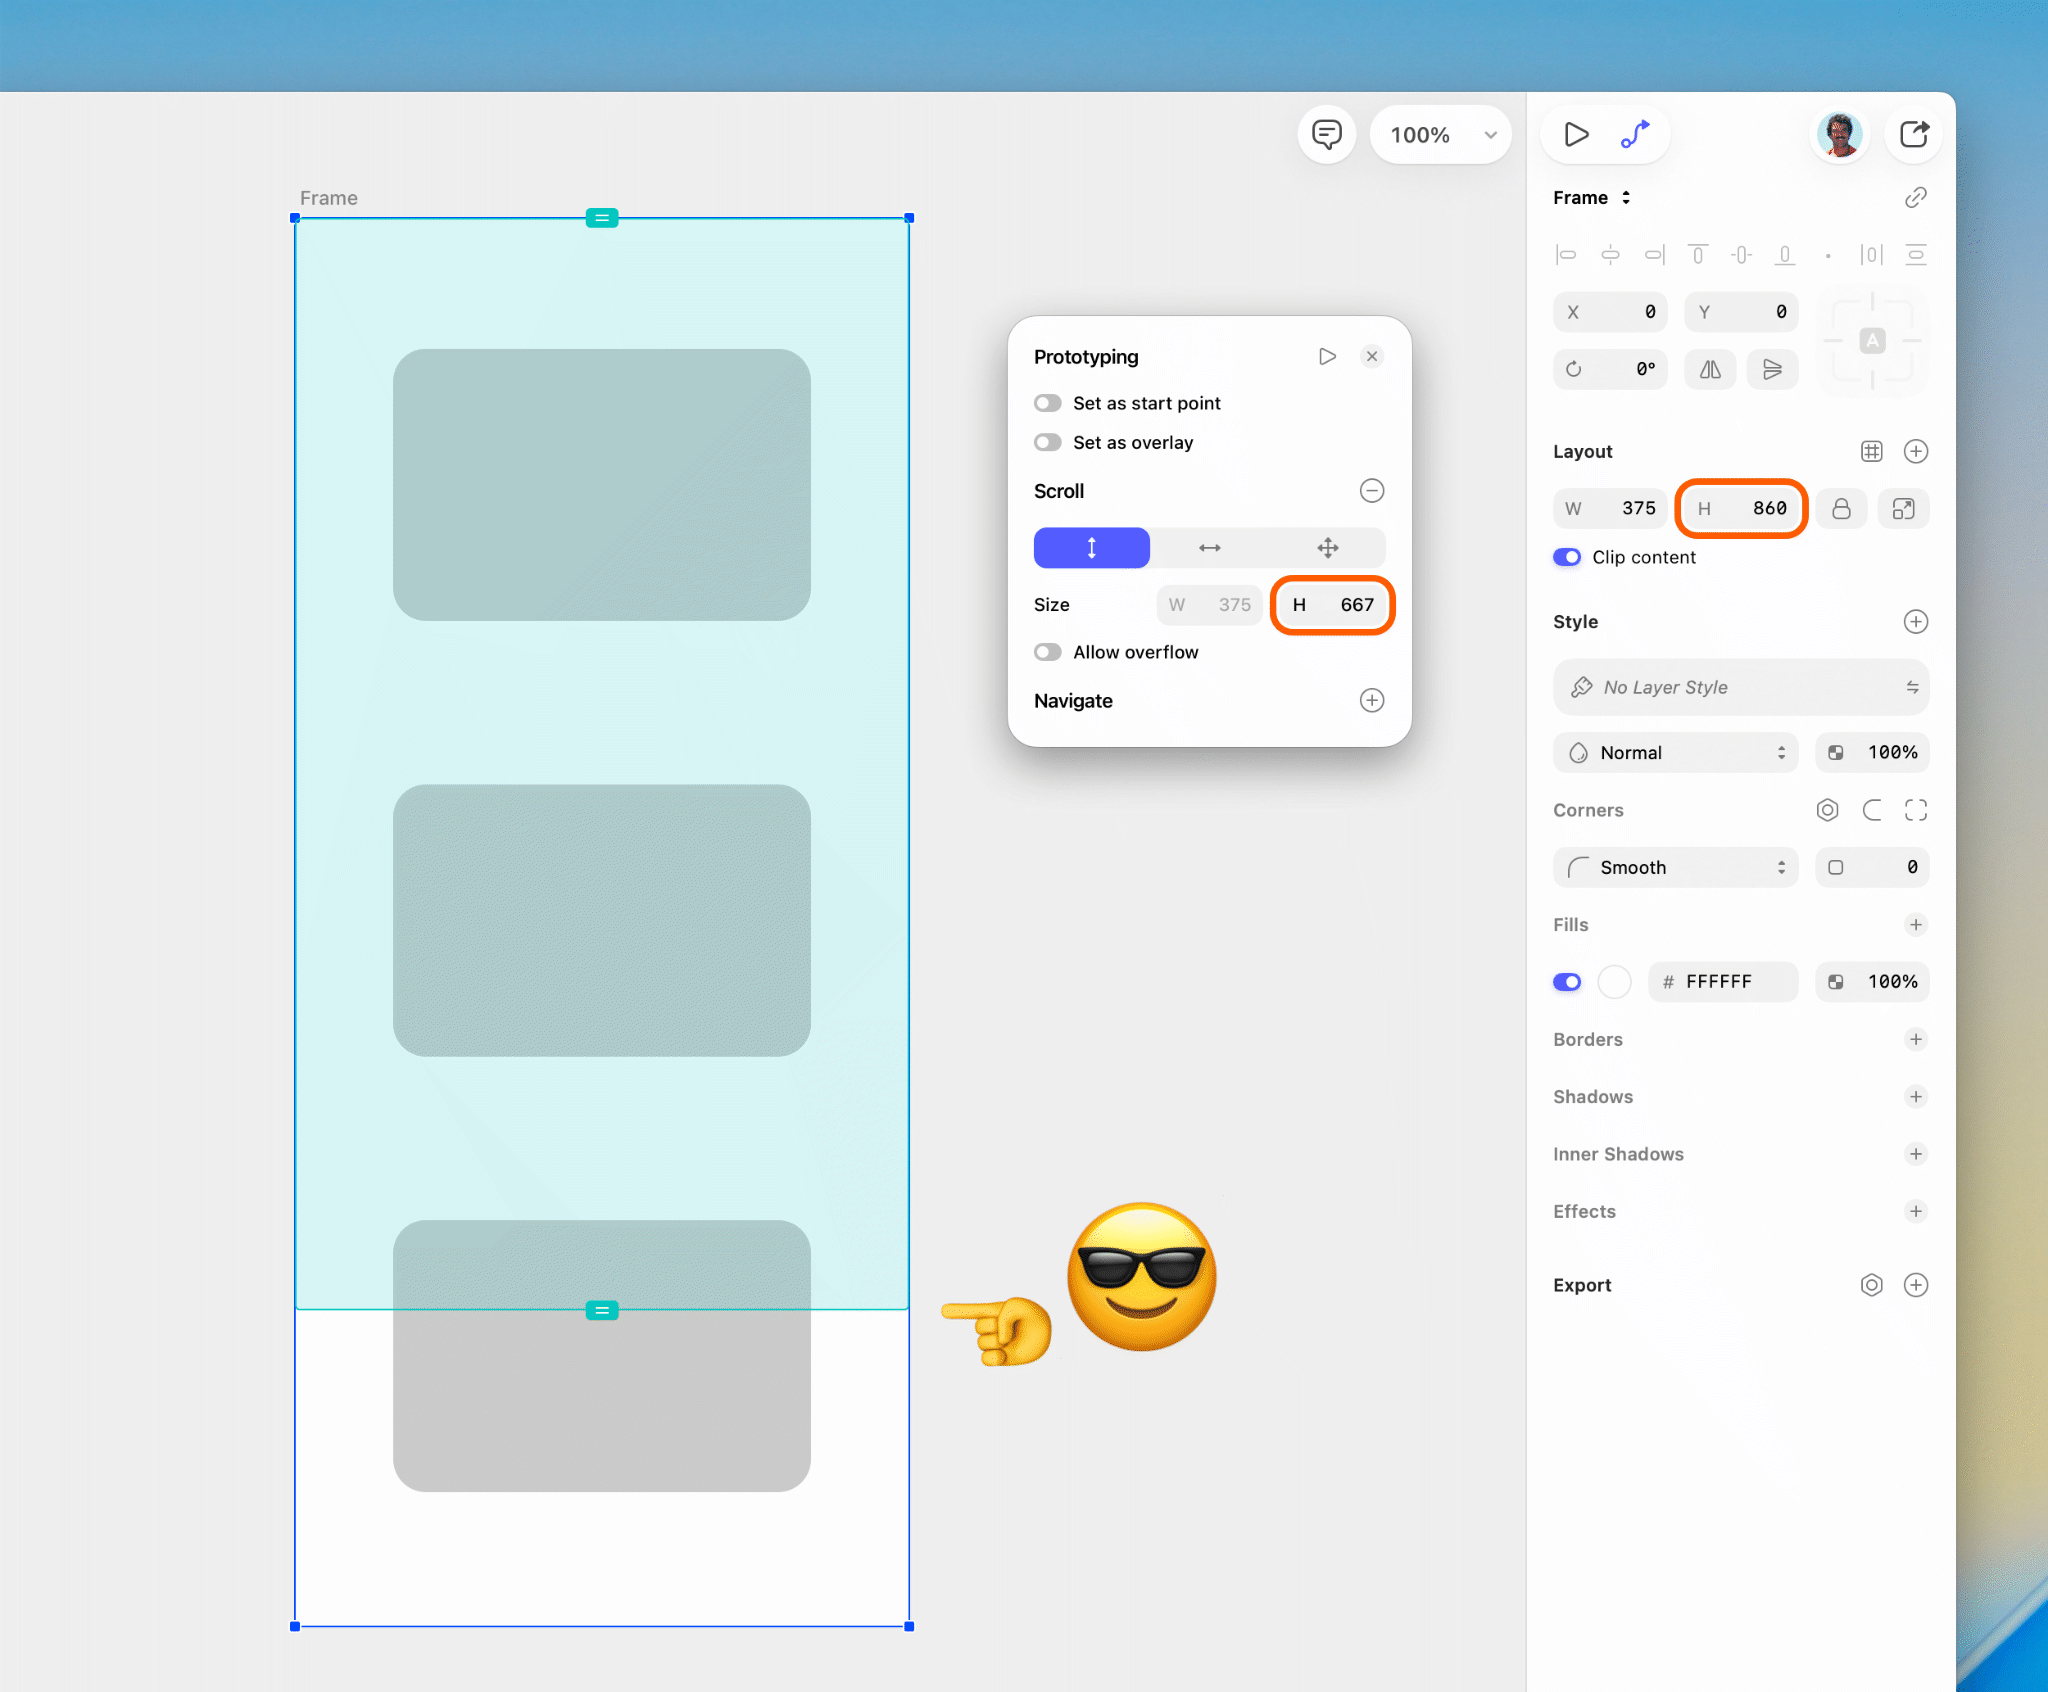
Resolution 1: Based on a Frame Preset
When a Device Template or Frame Preset is used, Vertical Scrolling should be enabled automatically, with the Viewport pre-matched to the Preset dimensions. This is what users expect — so the app should handle it for them.
All a designer then needs to do is extend the Frame height to accommodate their content. Nothing else.

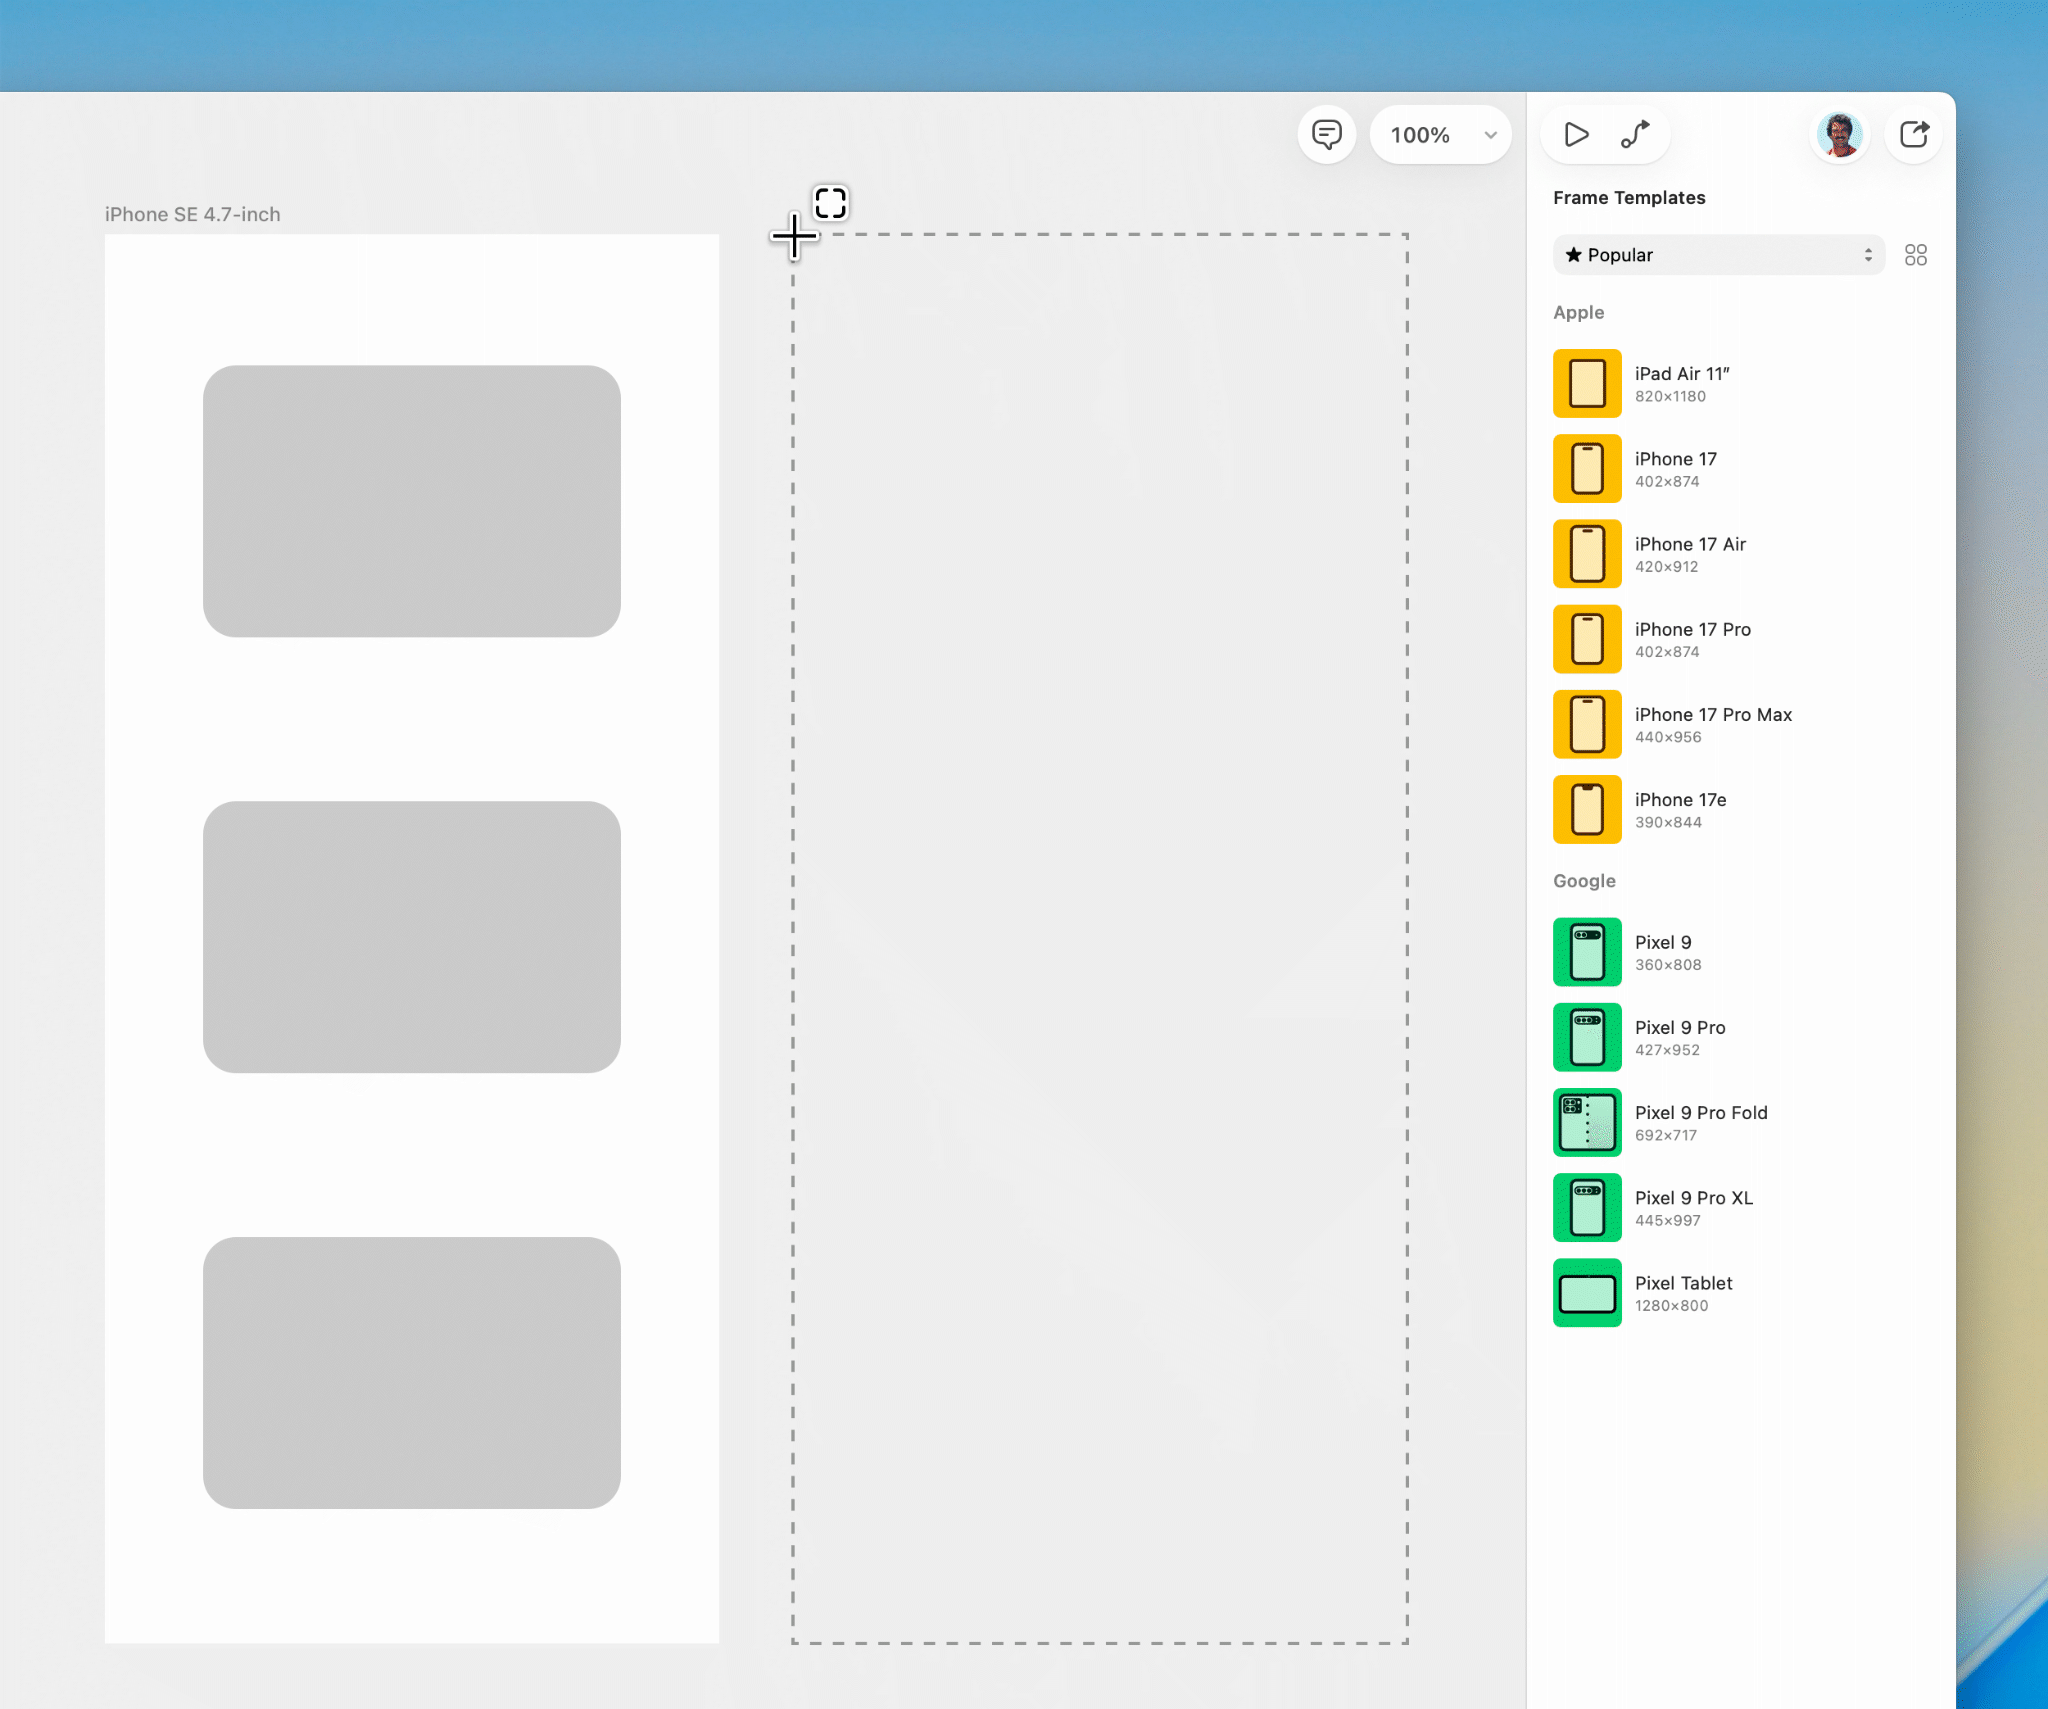
Start with the usual steps:
- In a new document, press “F”.
- Choose your Frame Preset.
- Drop it on the Canvas.
- Lay out your design and extend the height of the Frame to fit your content.
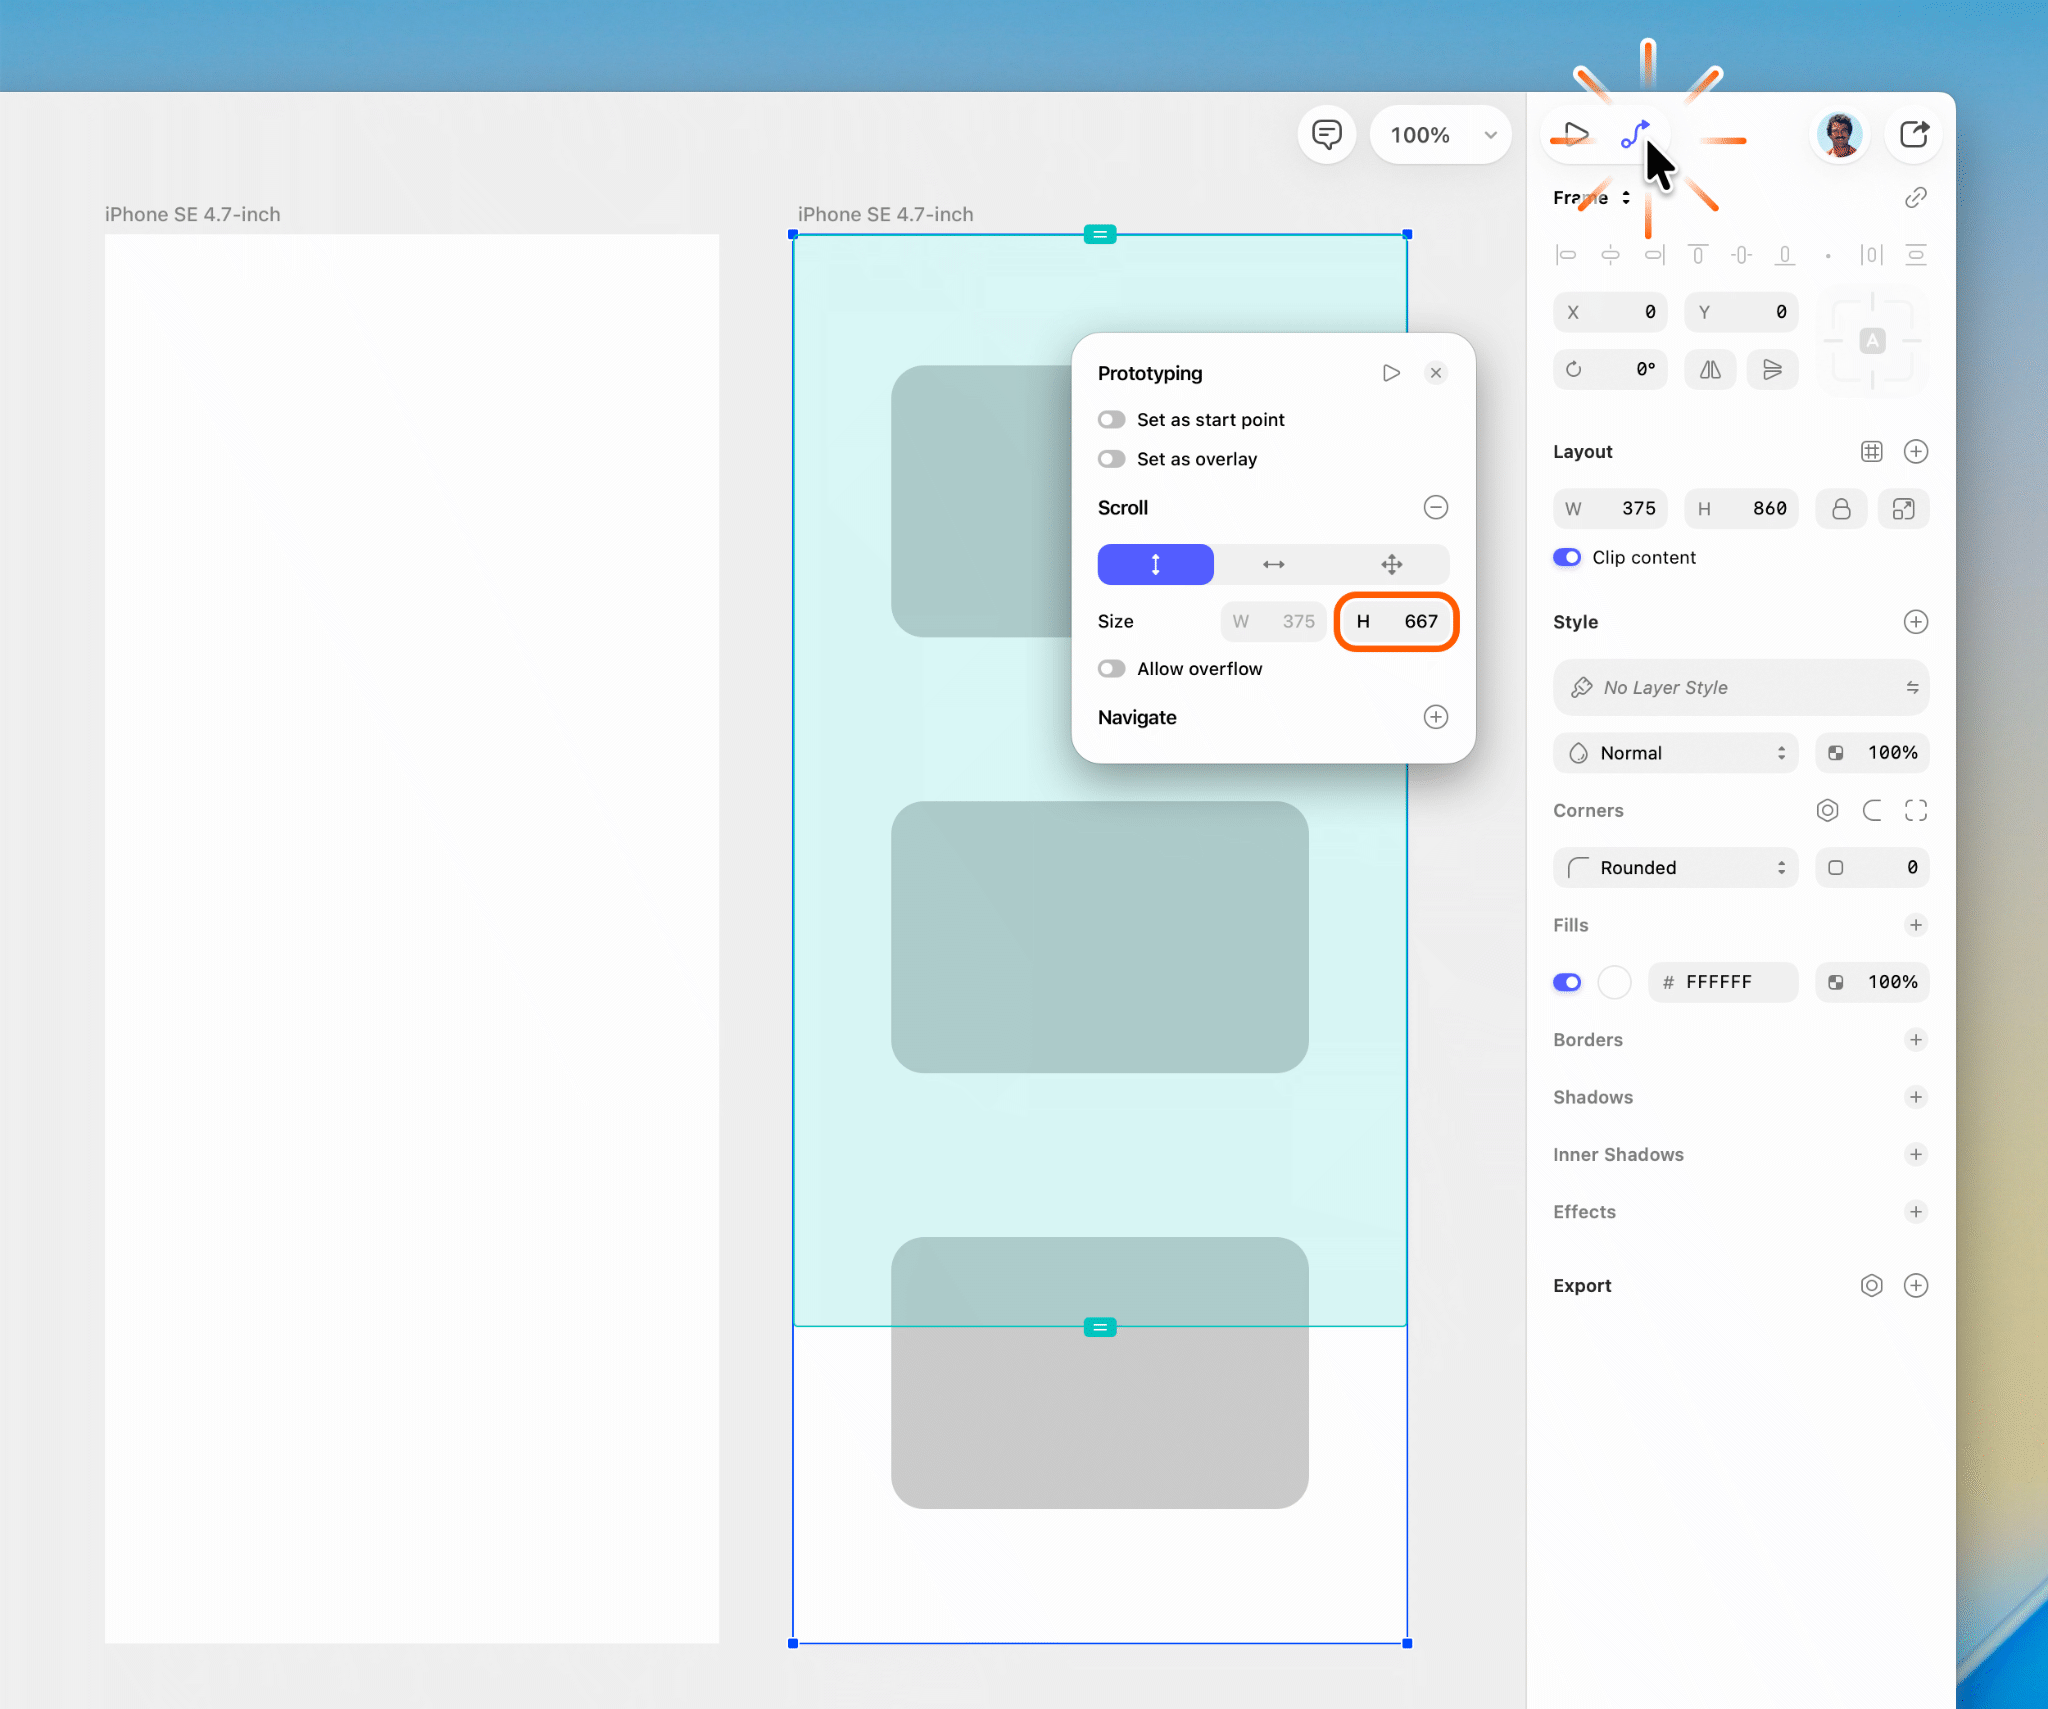
Open the Prototype panel. Because the Frame is based on a recognised Preset and has been extended vertically, Vertical Scroll is applied automatically. The scroll area reflects the original Preset dimensions, not the current Frame dimensions, and is also viewable directly on the Canvas as an overlay on top of the Frame (more on this in the “Problem 3” section below). Since scrolling is vertical only, the Scroll Size area’s width is visible but disabled.
The redundant secondary “Template” selector for the scroll area is also removed in this proposal. The Preset dimensions are already known and displayed, and having the ability to select other template sizes is unnecessary — for example, offering an iPad scroll area template within an iPhone Frame serves no meaningful purpose.
If desired, the scroll area can still be adjusted manually — by dragging directly on the Canvas, or by entering a value in the panel.
Note that with this method, the scroll area Size cannot exceed the Frame dimensions, resolving another separate issue (more on this in the “Problem 2” section below).
Resolution 2: With a new custom-sized Frame
This addresses how Sketch handles the new workflow of pressing “F” to create a second Frame of the same dimensions after having previously placed a Frame Preset.
The flaw in the previous system was clear: scrolling required an Artboard Preset — without one, scrolling simply wasn’t available, and that needed fixing. However, the solution took a misguided approach: mistakenly applying parity and identical behaviour across Presets and non-Presets, and across Canvas Frames and nested Frames alike. This pursuit of consistency overcomplicated and broke a workflow that had previously been seamless.
Canvas Frames and nested Frames serve fundamentally different purposes. The former essentially functions as the “screen” in a prototype, and the latter as a container within the screen. Treating them identically only creates problems.
The fix is straightforward: when pressing “F” to create a new Frame, if the preceding Frame was based on a Preset Template, then the new Frame should inherit that same Preset — not simply adopt its pixel dimensions as a plain custom Frame. It can read dimensions data from the previous frame, and it can also read also its Scroll settings and that it was a Preset, and apply the same on the new frame.
Combined with the previous resolution, a Preset need only be chosen once. Everything works correctly from that point forward…
In a document where a Frame Preset has already been placed and the height has been extended, press “F.” A prompt appears to create a new Frame at the same extended size as the previous one.
Click to create the second Frame. The key change: if the previous Frame was based on a Preset Template, the new Frame inherits that Preset rather than being created as a plain custom Frame of matching dimensions.
Open the Prototype panel. Because the preceding Frame was Preset-based, Vertical Scroll is applied automatically, with the scroll area reflecting the inherited Preset dimensions. The Scroll Size area’s width is shown but disabled, as scrolling is vertical only.
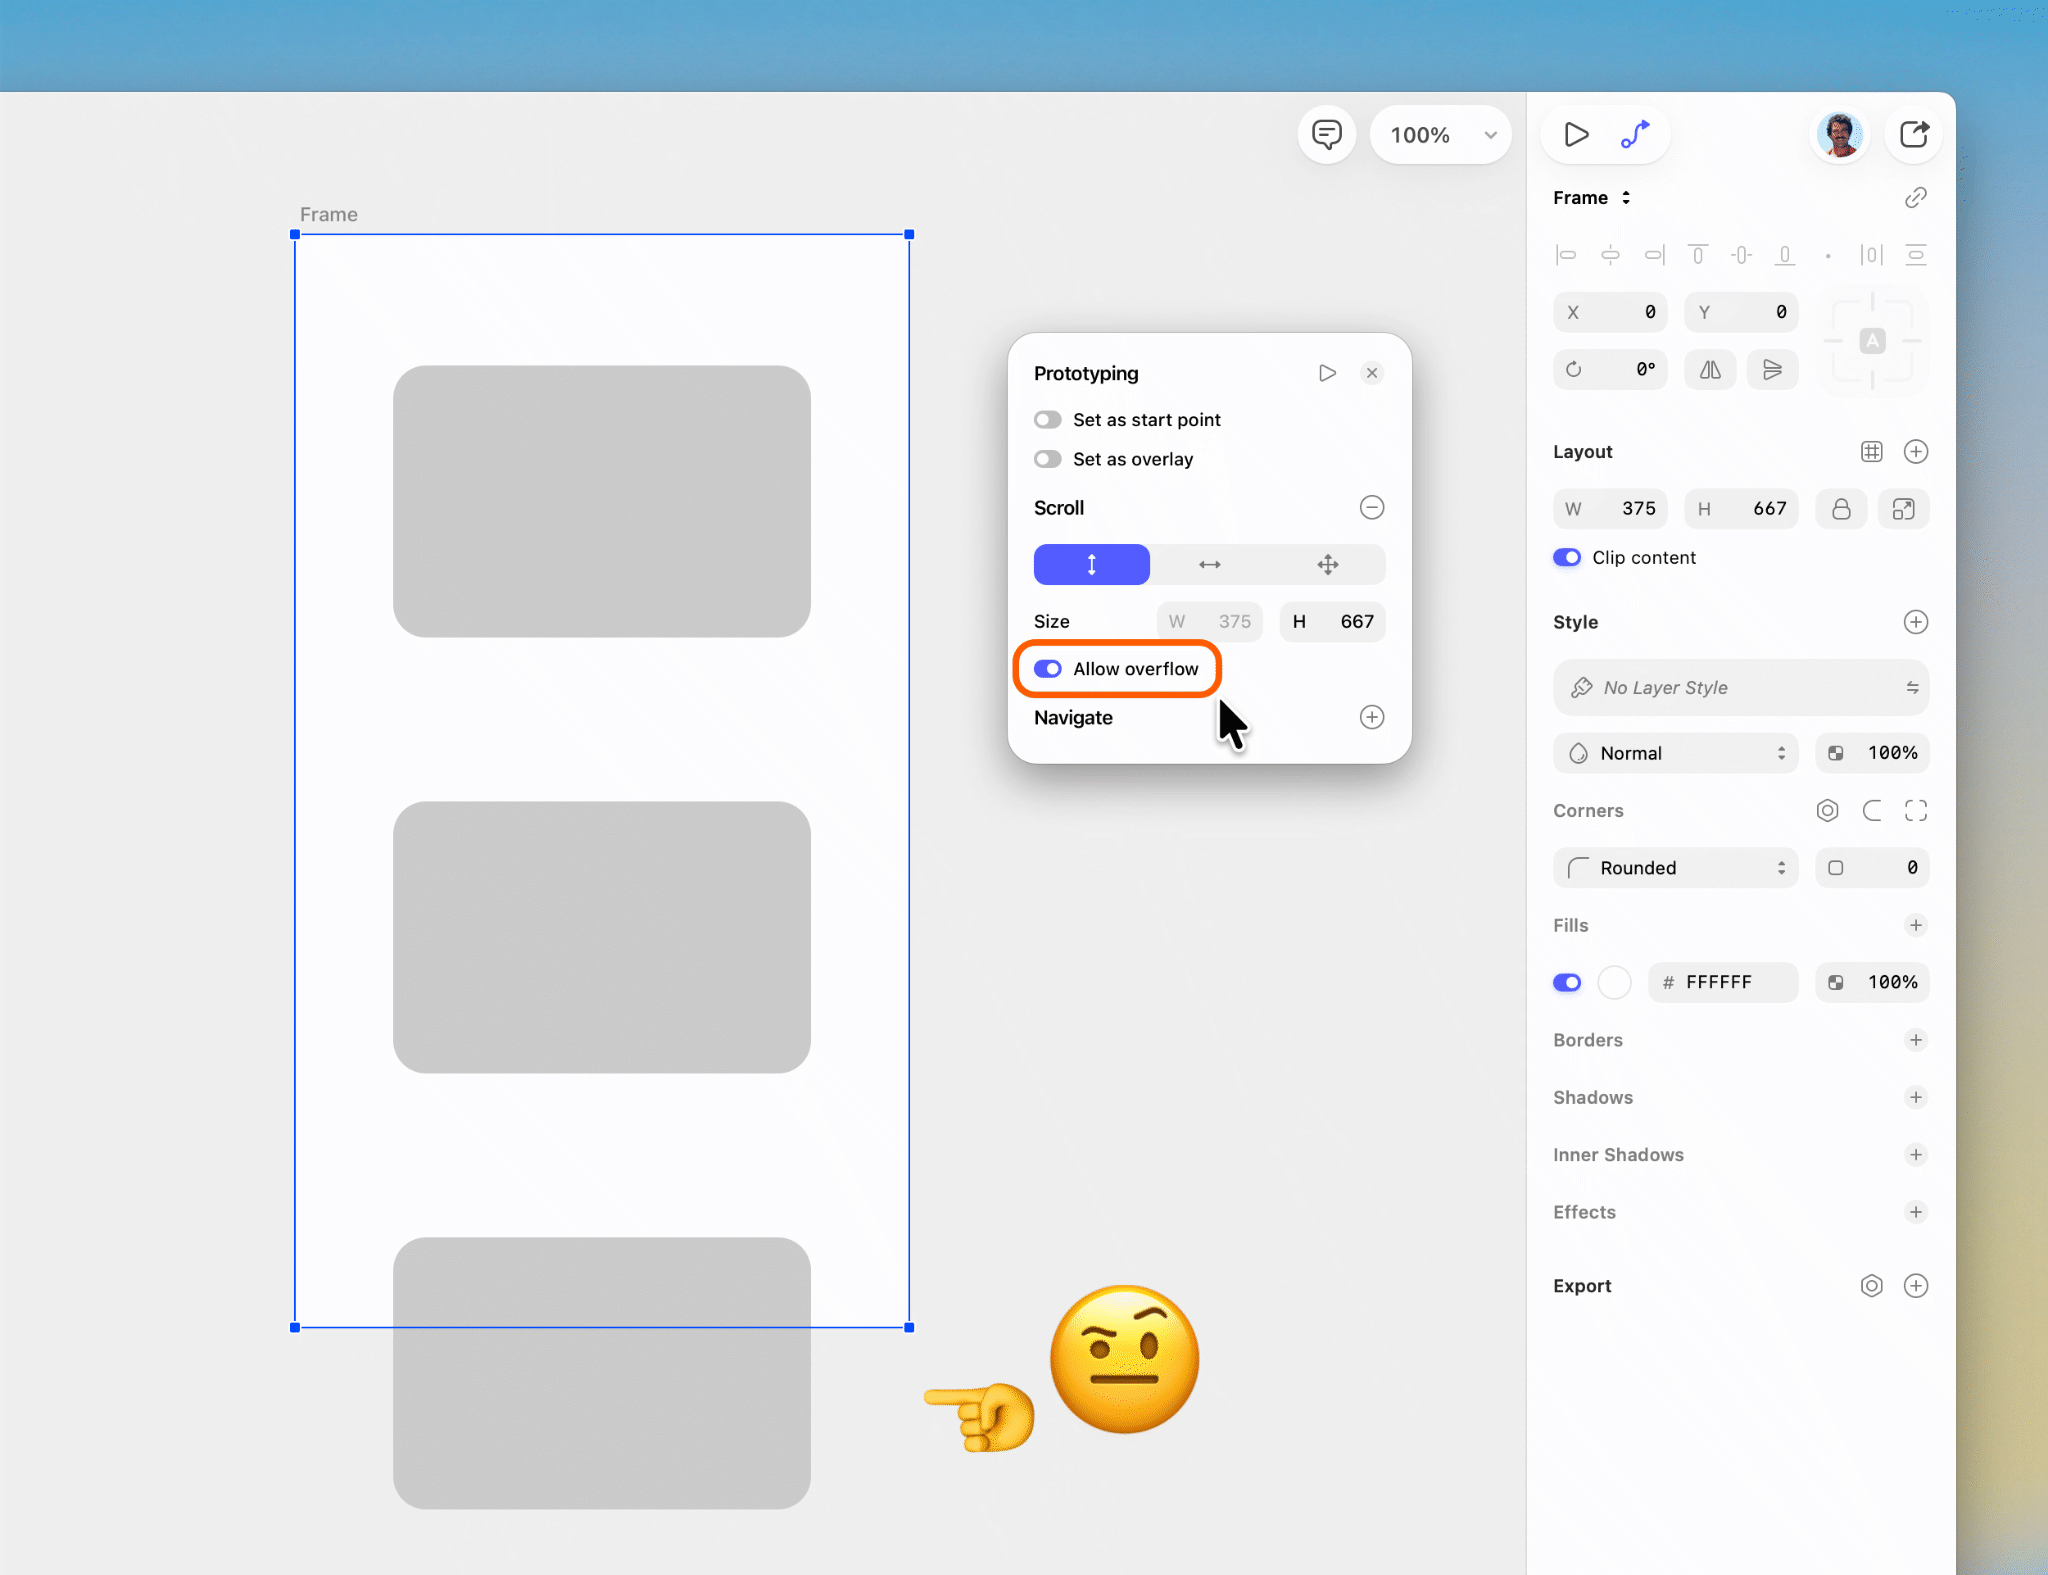
Problem 2:
A second regression emerged: the updated scroll settings made it possible to scroll into areas that should remain out of reach — for example, past the top edge of a Frame, into content that was intended to be cropped.

When a Frame‘s height is extended to allow for additional content and Scrolling is enabled, it inadvertently also enabled scrolling past the Frame’s edges, into content that the Frame boundary was meant to conceal, where it was “masking” it.
In the example above, this allowed the user to scroll to areas of the image outside of the Frame, as indicated by the dotted line.
Unless this was the intention, the new “Allow overflow” option which I introduced provides the means to prevent it, by making sure it’s toggled off.
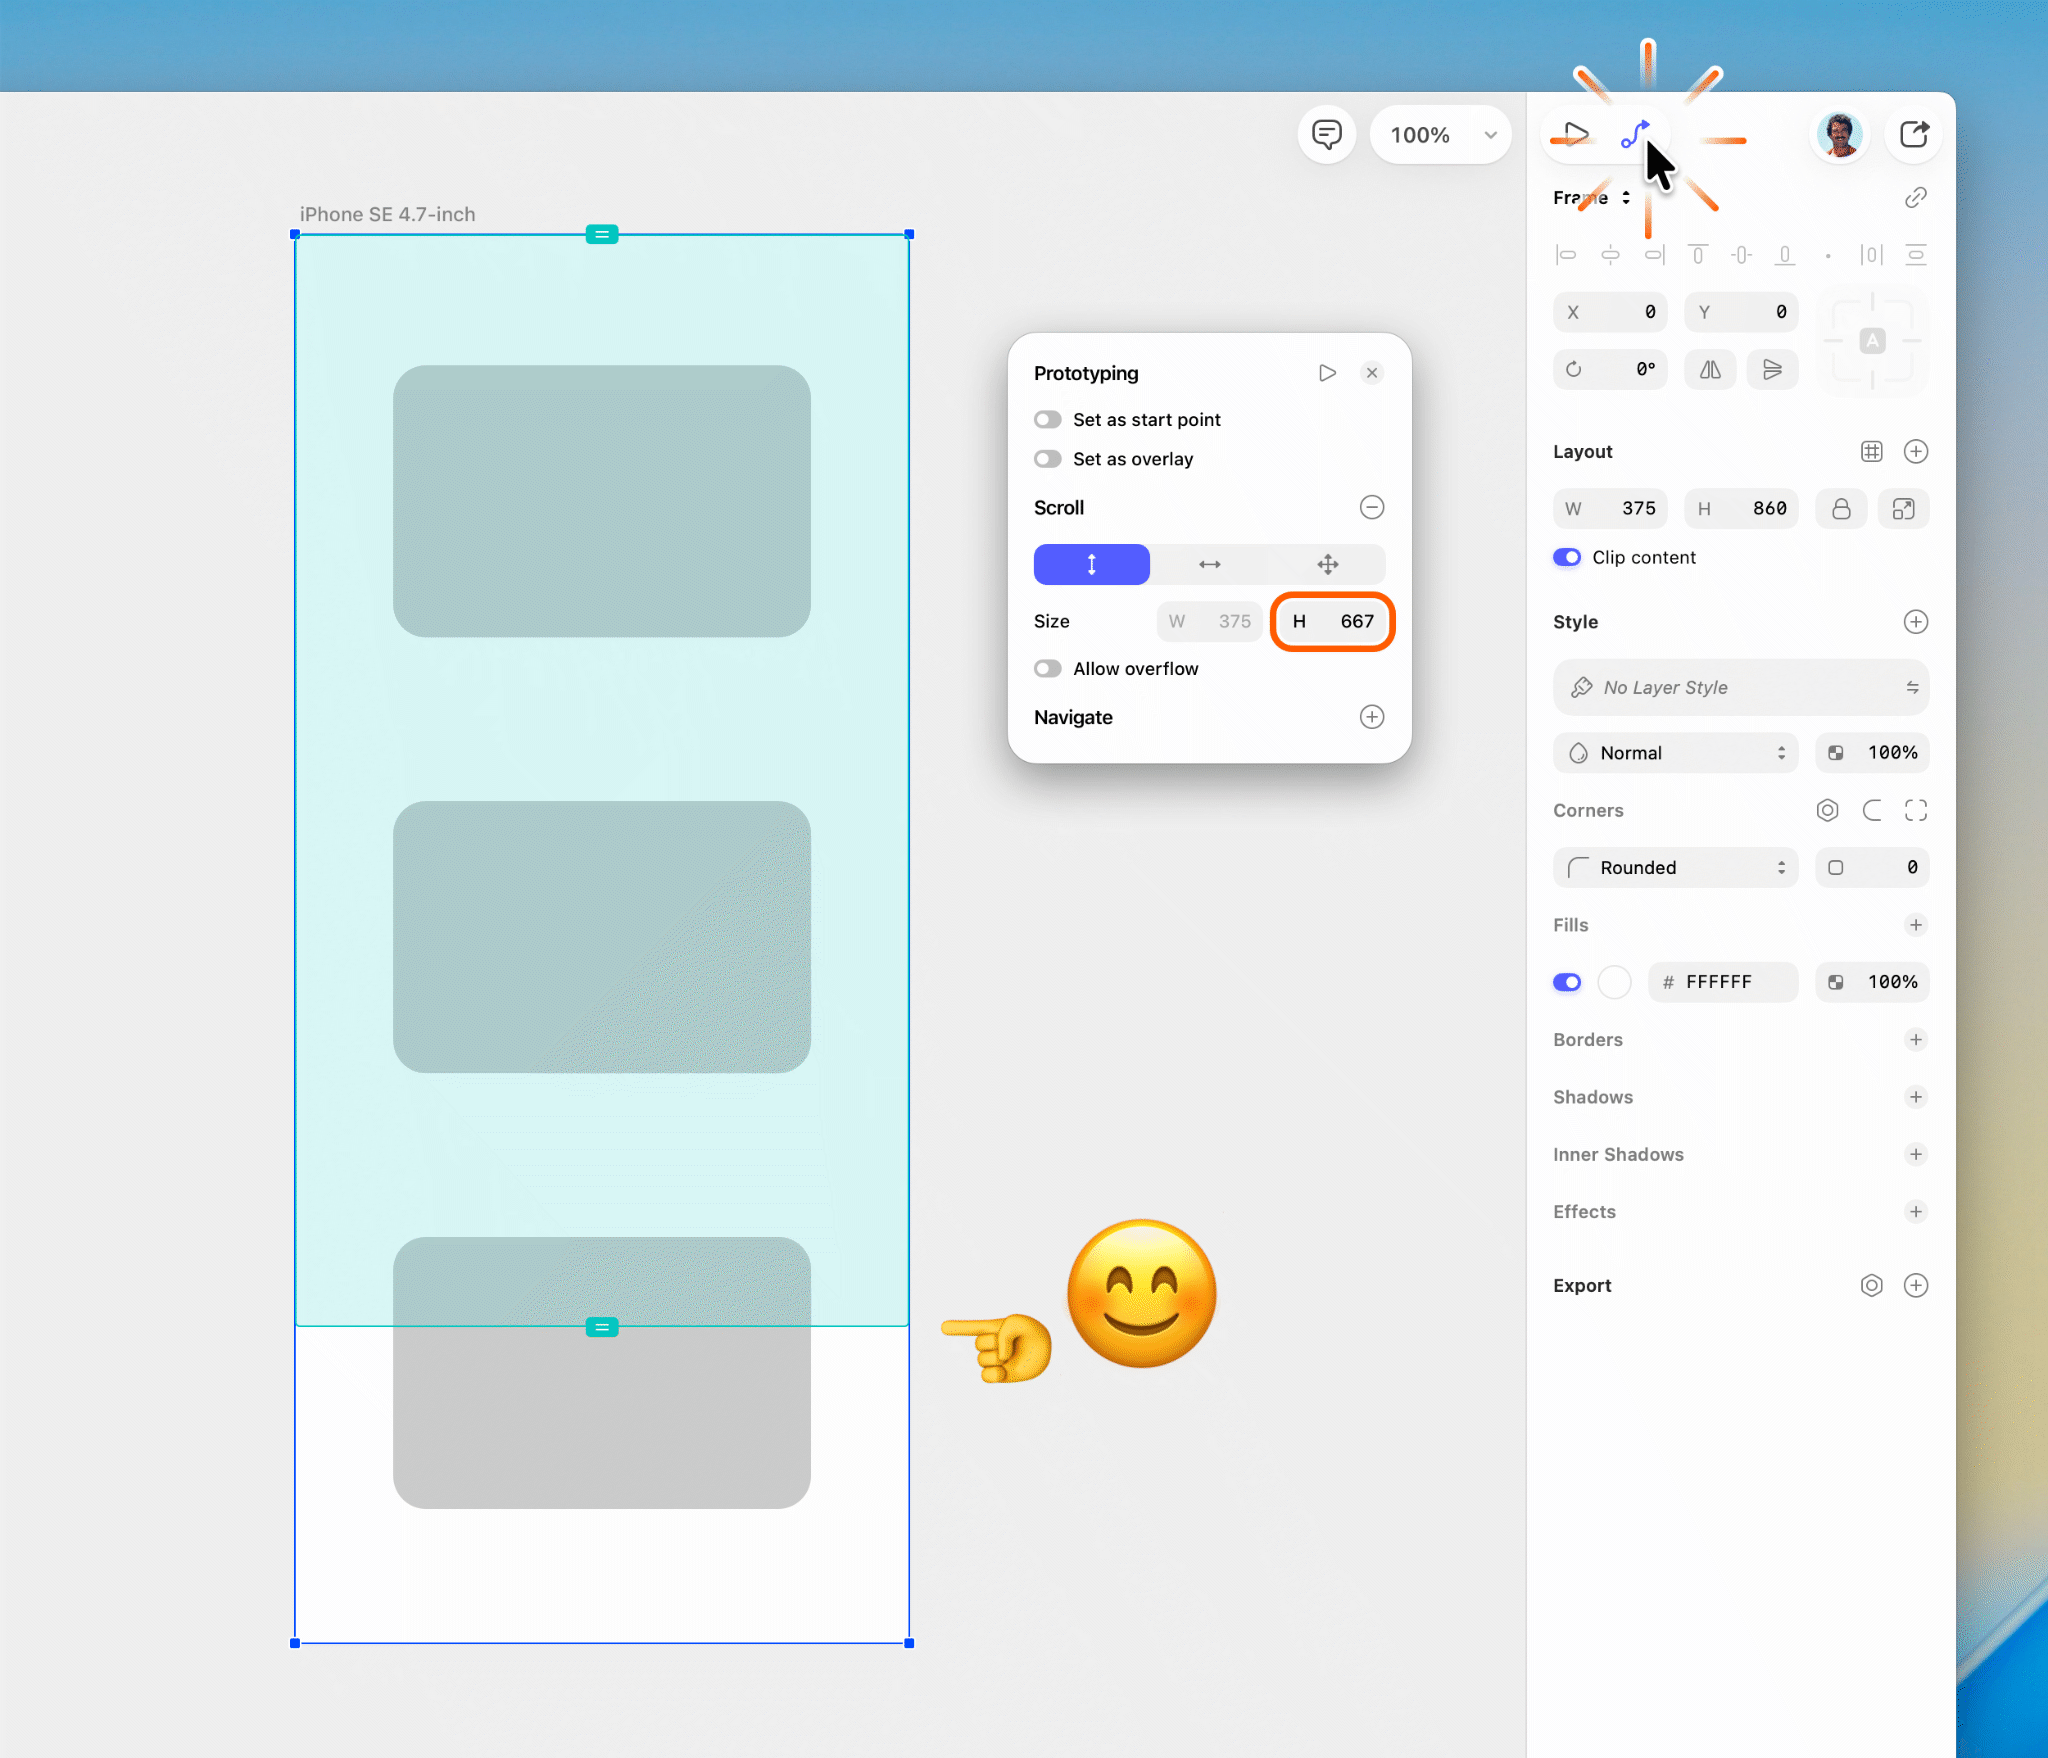
Problem 3:
Even when scrolling is correctly configured, there’s no way to see where the scroll boundary actually falls — making it impossible to know what content will be visible on load and what lies beyond.
The interface offered no visual indication of scroll area boundaries, leaving users to guess. While not a new problem, the introduction of a configurable scroll area made it a glaring oversight. The information existed, but wasn‘t being surfaced where it was most needed: directly on the Canvas.
The solution is a Canvas overlay that renders the scroll boundary directly on the design. Beyond being a useful visual aid, it also enforces a logical constraint the interface currently lacks: the scroll area cannot exceed the Frame dimensions. The UI presently permits this — but the prototype ignores the excess regardless, making it a source of confusion with no practical effect.
For example, it could be possible to have:
- Frame height: 200px.
- Content height: 300px.
- Viewport scroll area: 400px.
- Result: scrolling still stops at 300px.
In summary – three problems, three fixes
- Scrolling now “just works” again — place a Frame Preset, extend the height, and it‘s done. No manual configuration. No repeated steps.
- A: Dramatically fewer steps, with no repetition across Frames.
- B: A significantly clearer, less confusing experience.
- The scroll area is now constrained to the Frame boundary, eliminating a logically inconsistent UI option that had no real-world effect.
- A Canvas overlay clearly marks the scroll boundary on the design itself, removing all ambiguity about what falls within the viewable area on load.
Note: Every change described here is a UI-only adjustment — no structural modifications to the application are required.
See also:


Arbolito
UX/UI • App • Prototyping

Beko PLC
UX/UI • Website • Case Study

#SketchTips
Motion Design • Marketing • Audio Editing

Dog Friendly
UX/UI • Website
Blog Animations
Motion Design • Marketing • Illustration

Parachute Panic
Game • Illustration • Animation • UX/UI • Case Study

Leisure Food
UX/UI • App • Motion Design • Prototyping

Beyond Ynth
Game • Illustration • Animation • UX/UI

Sketch Tutorials
Marketing • UX/UI • Motion Design • Audio Editing

Projecto
UX/UI • App • Case Study

Social Videos
Marketing • Motion Design • Illustration • Audio Editing

Buy: Case Study
Case Study • UX/UI • Marketing • Website
Sketch UX / UI Improvements
Case Study • UX/UI • Prototyping • Motion Design • Audio Editing

London Unfurled
UX/UI • App

Emails
Marketing • Illustration

Canary Islands
UX/UI • Website • Prototyping • Marketing
Blomberg
UX/UI • Website
Icons
UX/UI • Illustration • Marketing • App • Game

This is just a small selection of my work. Please contact me if you wish to see more.